Feature References
This page explains the settings and tools for working with Sprytile.
Tile Palette
The tile palette appears in the viewport when Sprytile tools are in use. This lets you select the tiles Sprytile will build or paint into Blender.
Hold shift + Middle Mouse drag to move the palette around the viewport.
Scroll Wheel zooms the tile palette.
Ctrl + Scroll Wheel switches between tile grids.
Main Panel

This panel contains the main controls for Sprytile's tools. When you're using the tool modes or adjusting tile grids, this is the panel you'll most likely be interacting with.
Build Tool Settings
Build Tool Options
The icons and options in the build tool carry over to the other Sprytile tool modes. Refer to this section if the icon you're looking for isn't covered in the other tool settings.
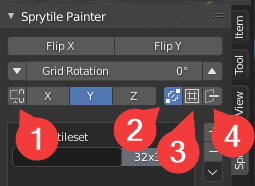
- Flip X/Flip Y — Flip tile orientation for placement
- Grid Rotation — Rotate tiles for placement
Axis Indicator — The X/Y/Z buttons light up according to the Work Plane axis.
Pressing the X/Y/Z buttons will lock the work plane to that axis.
- Axis Lock Toggle — Lock/unlock the work plane to the current axis
- Auto-join — Placing tiles will automatically join vertices
- Join Multi — When building with multiple tiles selected, joins them to a single face
- Allow Backface — Sprytile will work with backfaces when toggled on
Paint Tool Settings
Paint Tool Options
The paint tool options allow you to control how Sprytile will fit the tile selection onto the painted faces.
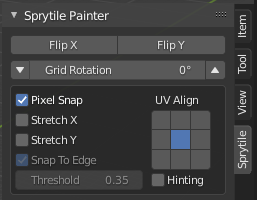
| Option | Description |
|---|---|
| Pixel Snap | UV vertices are snapped to the pixel grid |
| Stretch X/Y | Force painted faces to fit into the tile selection |
| Snap To Edge | If a UV vertex is close to the edge of the tile selection, snap it to the edge |
| Threshold | how much the UV vertex needs to be close to the edge |
| UV Align | Controls alignment of painted face to the tile selection. Most relevant when stretch options are turned off. |
| Hinting | Selected edges will be used to indicate to Sprytile which part of the painted face is considered down |
Fill Tool Settings
Fill Tool Options
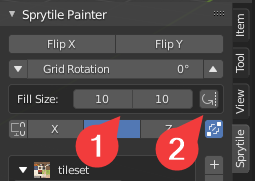
- Fill Size - Size of fill grid
- Lock Transforms - Keep the rotations of filled tiles
Grid Settings
This is where you can create additional tile grids, or add new tilesets
Special Grid Types
1x1 Tile Grids
Creating a 1x1 tile grid allows the most flexibility when using Sprytile, allowing you to freely select any part of your texture for use with Sprytile's tools.
Grid Settings Details
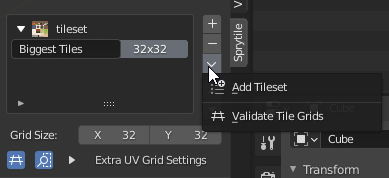
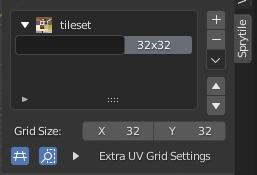
Tile grids can be named in the left part of the grid selection list, to help with organizing grids.
Pressing the + button will duplicate the currently selected grid, and the size can then be adjusted using the Grid Size input.
The - button will delete the selected grid.
Additional tilesets can be loaded using the dropdown menu.
If the grid list starts bugging out, please use the Validate Tile Grids tool.
Extra Grid Settings
Selecting a grid and expanding Extra UV Grid Settings gives access to additional settings to tweak.
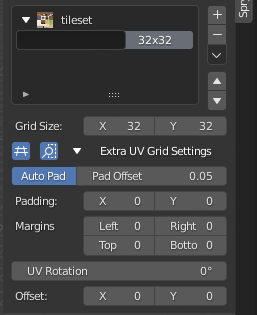
Tile Bleed
Bleeding is when textures spill outside tiles or create seams in real time engines. To address bleed, you can use the Auto Pad or Padding settings.
Auto Pad will move the UV edges inward by a subpixel amount, set by Pad Offset.
Padding will add extra pixels to the top and sides of tiles, to allow you to manually paint in the bleed safe space.
Offset
Offset changes the origin of the tile grid in the tileset texture. This allows for grids of different sizes to be used in one texture without having to find a common denominator to make the grids fit.
The origin of the offset is from the lower left corner of the texture.
Margins
Some tilesets may leave pixel gaps between tiles. You can try adjusting the padding and margin values to work with those tileset.
Workflow Panel
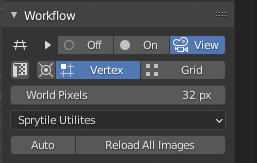
Workflow Details
Cursor Flow
Turning on Cursor Flow will automatically move the cursor to the last tile you placed, which can be useful for larger projects.
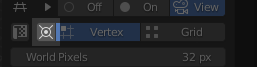
UV Correction Toggle
Blender 2.9 introduced UV correction, which automatically preserves UVs as you move mesh elements around. When combined with increment snapping, this gives pixel perfect UV editing in the viewport.

When Sprytile is installed in 2.9, this toggle is available to quickly turn it on and off.
Image Reload
Pressing the Reload All Images will reload all images that are used by your scene, allowing you to quickly refresh textures after editing them in an external program. Toggling on Auto will automatically refresh the textures every second.
Sprytile Utilities
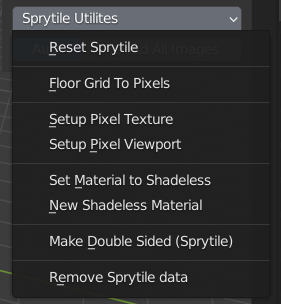
This menu contains some helpful tools for Sprytile's workflow. This is available in Sprytile's panel under Object and Edit mode.
Utility Details
Reset Sprytile - If Sprytile breaks, it might be necessary to use this.
Floor Grid To Pixels - Set Blender's grid subdivision to the world pixel density, useful for making Blender's incremental snap to one pixel.
Setup Pixel Texture - Give textures the crunchy pixel art look.
Setup Pixel VIewport - Blender's default viewport renderer has a slight color tint, for a more cinematic look. If you're only going to do shadeless rendering, this will remove the tint.
Set Material to Shadeless - Convert a material to a shadeless look node network, for pixel art styles. Sprytile uses this when loading tilesets.
New Shadeless Material - Create a new shadeless material
Make Double Sided - If your model will be used in a context where a double sided material is not possible or will not be used, this will duplicate and flip the normals of selected faces.
Recommended only as a finishing step, because it can make editing your model unweildy.
Remove Sprytile Data - Remove any Sprytile data from your blend file, in case tools are not compatible with the data.
Preferences
Sprytile's prefrences can be accessed through Blender's Preferences>Add-ons window, and searching for Sprytile.
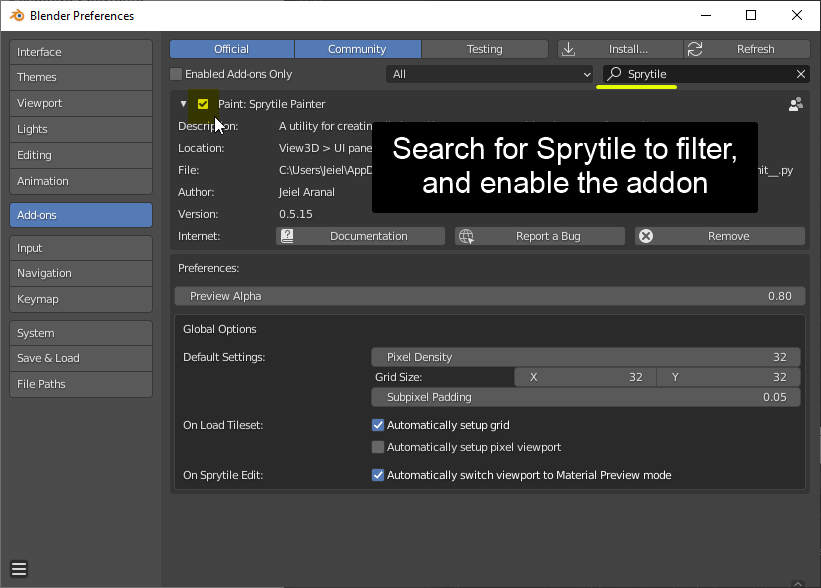
Preference Details
Default Settings
These are settings Sprytile will use when starting a new scene.
Pixel Density - Number of pixels per Blender unit
Grid Size - Default tilegrid size
Subpixel Padding - The pad offset value to use, for helping with tile bleeding in engine.
On Load Tileset
Sprytile will run these utilities when a tileset is loaded.
Automatically Setup Grid - Change Blender grid subdivisions to follow world pixel density.
Automatically Setup Pixel Viewport - Blender's default viewport renderer has a slight color tint, for a more cinematic look. If you're only going to do shadeless rendering, this will remove the tint.
On Sprytile Edit
Automatically swich viewport to Material Preview mode - automatically change Blender's viewport to show material, so that the texture shows.